That’s where Chocolatey comes into play. Use the free app Chocolatey to keep your software up to date. It’s easy, fast, simple, and did we mention free? Seems too good to be true, yet it is. But what is Chocolatey?
What is Chocolatey?
If you haven’t done things in the Windows command line, PowerShell, or Linux command line, the concept of Chocolatey can be a bit weird. Chocolatey is a machine-level program that helps you manage software. Machine-level meaning that there isn’t a graphical user interface that helps you do things. All the commands must be typed. Don’t let that scare you away! If you can write words, you can master this.
How do I Install Chocolatey?
There are a couple things Chocolatey needs to work. When a program needs other programs of Windows features to work, those needed programs are referred to as dependencies. Chocolatey’s dependencies are you must be using at least:
Windows 7 or newerPowerShell version 2 or newer.NET Framework 4 or newer Plus, you must have administrator access on your computer
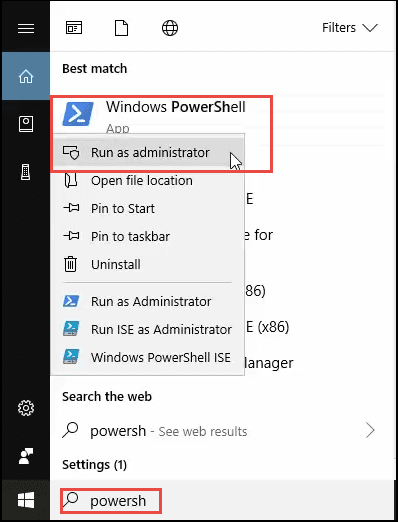
If you’ve got Windows 7 or newer, you’ve already got PowerShell version 2 or newer. If you aren’t sure if you have .NET Framework 4, don’t worry. When installing Chocolatey, if you don’t have .NET 4, Chocolatey will install it for you.Open PowerShell by typing in the Start Menu’s search box PowerShell. You should see a result come up named Windows PowerShell App. Right-click on that and select Run as Administrator. Doing this is known as running PowerShell in an elevated instance. It’s elevated to the Administrator’s privileges. The PowerShell window will open.In the PowerShell window, type or copy and paste the command:Set-ExecutionPolicy Bypass -Scope Process -Force; iex ((New-Object System.Net.WebClient).DownloadString(‘https://chocolatey.org/install.ps1’))The Set-ExecutionPolicy Bypass -Scope Process -Force part tells PowerShell that you don’t want to enforce the restricted execution policy for just this next thing. PowerShell, by default, will only allow signed processes to run. It’s the highest security setting. But we need to run this unsigned process of installing Chocolatey.The iex ((New-Object System.Net.WebClient).DownloadString(‘https://chocolatey.org/install.ps1’)) part of the command tells PowerShell to go to the Chocolatey website, download the install.ps1 script, and run it. That’s the part that really installs Chocolatey.You’ll see a bunch of text fly by. Feel free to go back and read it so you know what just happened. At the end, it suggests that you run the command choco /? to see a list of functions. That’s a good way to make sure your install worked. Go ahead and run that command.Another pile of text will fly by, which is also good to read and understand. At the end, if your install of Chocolatey worked, you’ll see something like the following, where the green part lists what version you’ve just installed.
Installing Software with Chocolatey
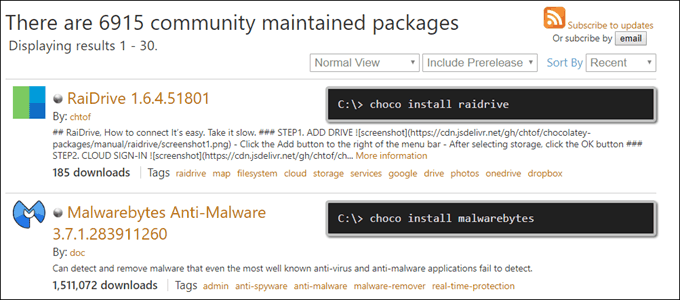
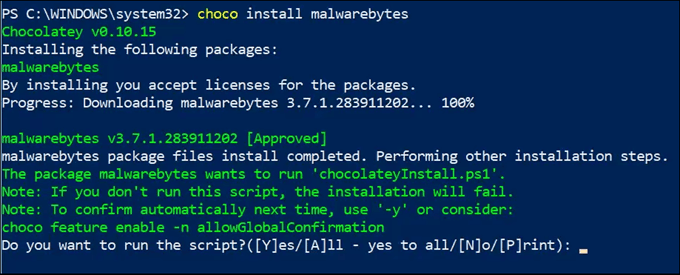
Let’s have a quick look at installing software with Chocolatey before we get to updating software with it.Go to the page https://chocolatey.org/packages to browse through the software that is available via Chocolatey. You’ll see that they are referred to as packages.Find a package that you’d like to install. For this example, we’ll use Malwarebytes Anti-Malware. It’s always good to have Malwarebytes on your computer.In an elevated instance of PowerShell, use the command choco install malwarebytes. That’s it. The install will begin. It will stop with the following text:If you’re comfortable allowing Chocolatey to manage your software, then when this install is done, we should use the choco feature enable -n allowGlobalConfirmation command so we can automate installations and updates in the future. For now, let’s just use A to complete the installation.You’ll see that Malwarebytes is downloading and then starts installing.In about a minute, Malwarebytes will be downloaded and installed without any further work for you.
Update Software with Chocolatey
Now that we’ve got some software installed, we can try updating it with Chocolatey. Again, you need PowerShell open as Administrator. Then you can run the command choco upgrade malwarebytes. That will make Chocolatey go out and see if there’s an update and then update it. We just installed Malwarebytes, so it will show that zero out one packages were updated. That’s okay.If you’ve installed several packages with Chocolatey, you can update them all with a one-line command: choco upgrade all -y. That’s as hard as it gets. Now what we must do to automatically update software with Chocolatey is to somehow make that command run on a schedule.
Automatically Update Software with Chocolatey
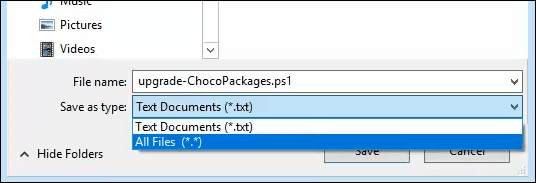
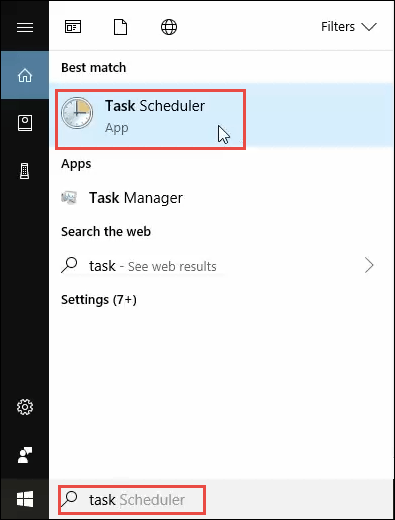
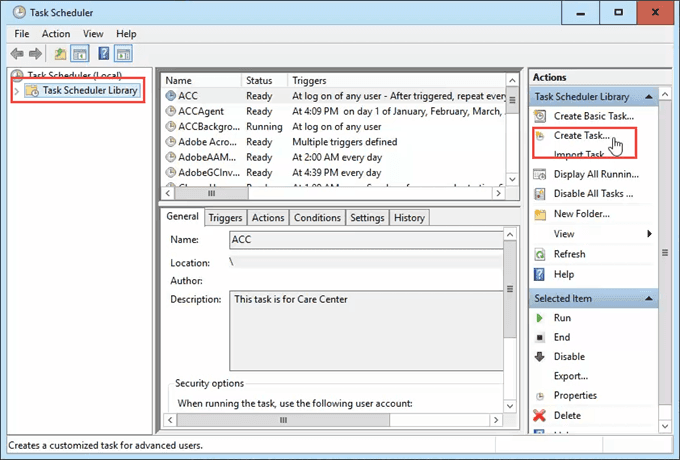
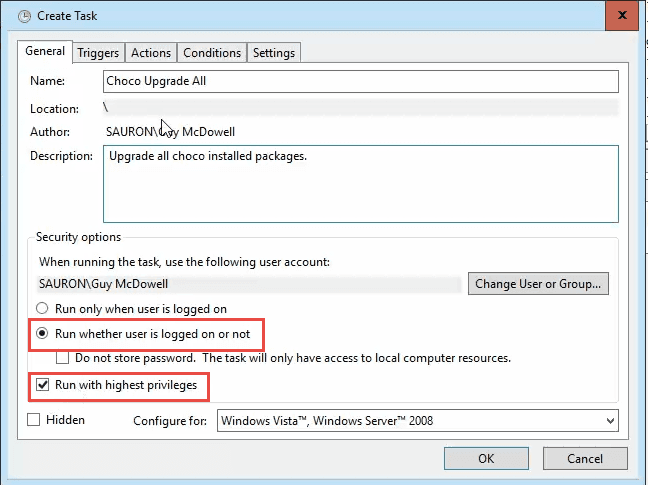
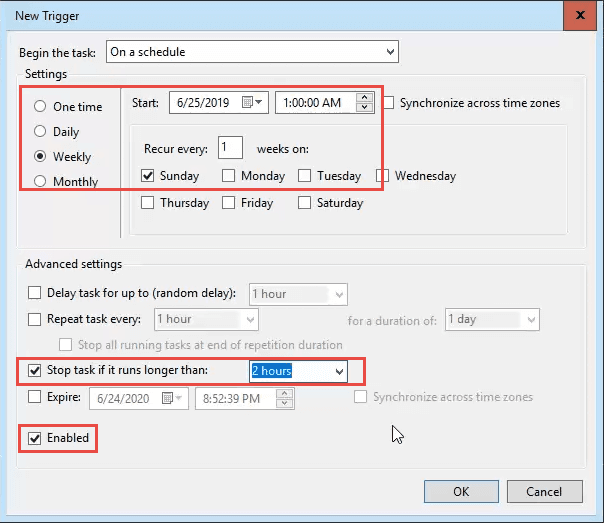
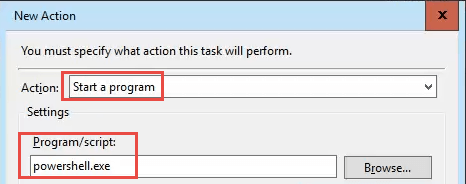
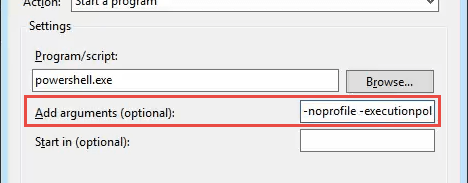
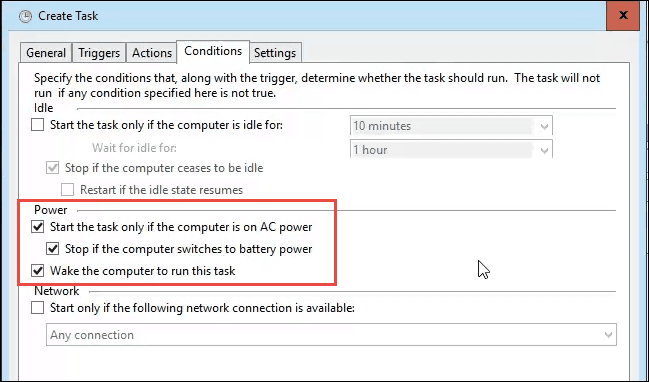
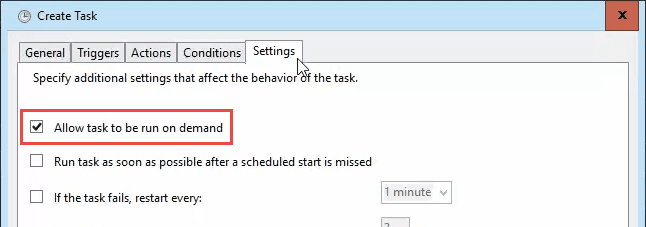
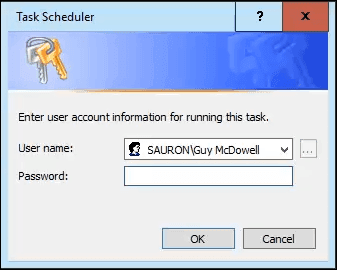
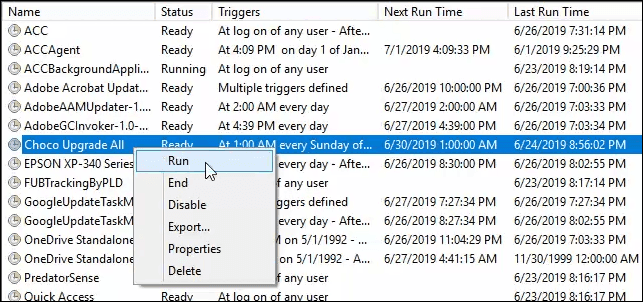
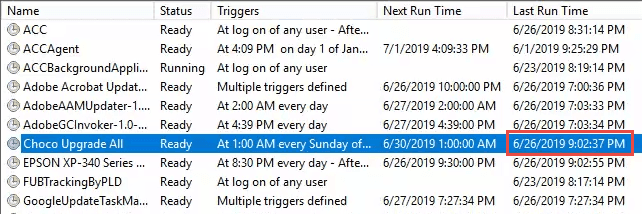
The next step you can do using wither Notepad or PowerShell ISE (Integrated Scripting Environment). We’ll do this example using Notepad as not all Windows versions have the PowerShell ISE.Open Notepad. Copy the command choco upgrade all -y into Notepad. Save that as PowerShell script by naming it something like upgrade-ChocoPackages.ps1. The .ps1 extension tells Windows that this is a PowerShell script. Change the file type from Text Documents (.txt) to All Files (.*). If you don’t, Windows will make it upgrade-ChocoPackages.ps1.txt and think it’s just a Notepad file.Windows comes with a great feature called Task Scheduler. The average home user probably doesn’t know about it, but Task Scheduler is the feature that already makes a lot of things run on a regular basis.In Start Menu search on Task Scheduler. Click on it when it comes up as a result.When Task Scheduler opens, click on Task Scheduler Library in the top-left area of the window. This will show you all the scheduled tasks currently set up on your computer. In the Actions pane in the top-right area, click on Create Task…. Create Basic Task isn’t suitable for this situation, as we’ll be using argument statements later.In the window that opens, in the General tab, give the task a name like Choco Upgrade All and then a Description like Updates all software installed by Chocolatey. If your current user account is not an administrator account on your computer, use the Change User or Group button to select the Administrator account. You’ll also need to know the Administrator account’s password. Make sure Run whether the user is logged on or not is selected. This will allow the script to run even if you’re not on your computer and it will have all the privileges it needs to do the job. The Triggers tab is where you tell the task when you want it to run. For this, once a week should be plenty. In our example, it’s set to run every Sunday at 1:00 a.m. Pick a time when you’re not likely to be using your computer, for best performance. It’s recommended to also check Stop the task if it runs longer than: and change the duration to 2 hours. You can adjust that as you’d like. To allow the trigger to apply, you must check the Enabled box at the bottom.Over to the Actions tab, and we’ll tell the task what we want it to do. The Action will be defaulted to Start a program. That is what we want so just leave that. In the Program/script field, type powershell.exe. This lets Windows know you’re going to be running a PowerShell script. In the Add arguments field, enter the following arguments. -noprofile – This prevents PowerShell profile scripts from running and tells it to just run the script that you want. -ExecutionPolicy Bypass – If you’re not sure if script execution was enabled, it’s good to have this in the arguments. It will ensure the script runs.-file – This is the argument that tells Task Scheduler that whatever follows next is the path to the file that we want PowerShell to run. In our example, the script was saved to C:\Scripts\upgrade-ChocoPackages.ps1. It may be different on your computer, so adjust accordingly. If the path to your file has any names with spaces in them, you’ll need to put the entire path inside of quotes.The full argument will look like -noprofile -executionpolicy bypass -file C:\Scripts\upgrade-ChocoPackages.ps1On the Conditions tab, there are more options we can set on how the script is to run. Look at them to see which ones you’d like to apply. For this example, it is set to Start the task only if the computer is on AC power and Stop if the computer switches to battery power to ensure we’re not running down the battery. Wake the computer to run this task is selected to ensure the task runs, whether the computer is in sleep mode or not.In the Settings tab, it’s recommended to check the Allow task to be run on demand box, so that we can manually test the task when we’re done. The default selections for the remainder are fine.Click OK to finish creating the scheduled task. A window should pop up with the name of the user you selected back on the General tab. You must enter the password for the user and click OK. This tells Windows that you do, indeed, have the authority to run the task. Now you’re back to the main Task Scheduler window. Find your new task. Right-click on the task and select Run to test it. You won’t see anything significant happen, except the status of the task will change to Running. In a minute or so, you should see the Last Run Time also change to the timestamp when you started running the task. If you didn’t get any error messages, the task should be fine. Close the Task Scheduler window and don’t worry about having to manually update any of the software you installed with Chocolatey again.
All Done!
It may seem like a lot of work to set this up. Consider this: it took you somewhere between 10 and 30 minutes to set this up. If you’re using this to update 10 programs, and each program takes about 6 minutes to go through the updating process every month, you’ve saved yourself between 30 and 50 minutes. You’re already ahead in time saved. Over the course of a year, that could be 6 to 10 hours of time saved. That’s not including the time saved by knowing how to use Chocolatey to install programs in a minute or two instead of 10 or 15 minutes.

