My iPad was Wi-Fi only, so I was able to connect to his laptop Wi-Fi and get Internet access. The only other time I have used it is when I was staying in a hotel room and they only had a wired Ethernet connection for Internet. I setup my computer and created a personal Wi-Fi network so that everyone else could connect their smartphones, tablets, etc.In this article, I’ll show you how to share your Internet connection from your Windows computer. Not that this only works well in certain scenarios.If you match up with those three items above, then you will most likely be successful in setting up a shared Internet connection. Now let’s get started.
Create Virtual Wireless Network
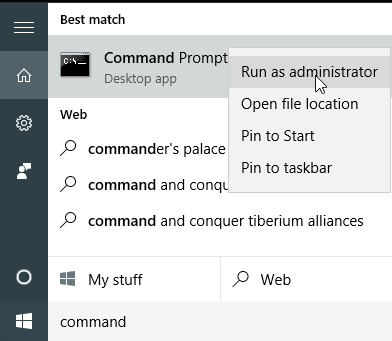
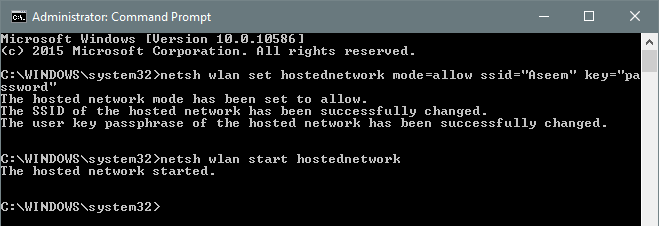
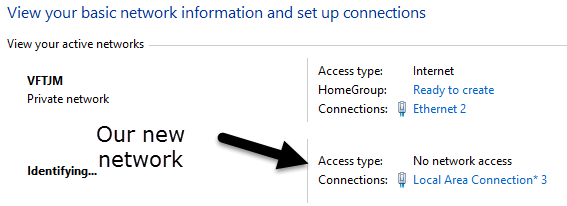
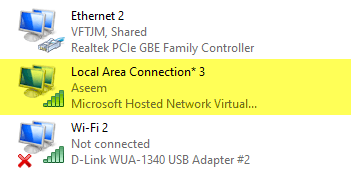
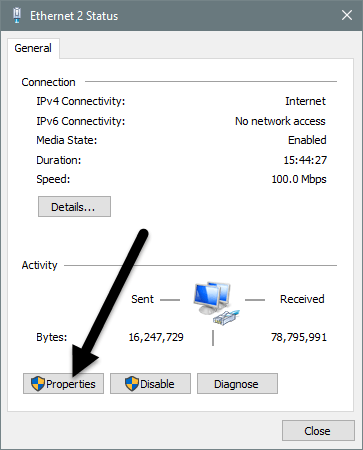
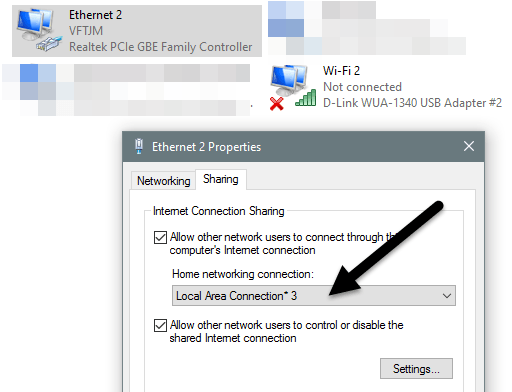
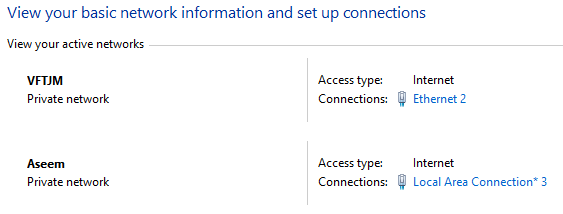
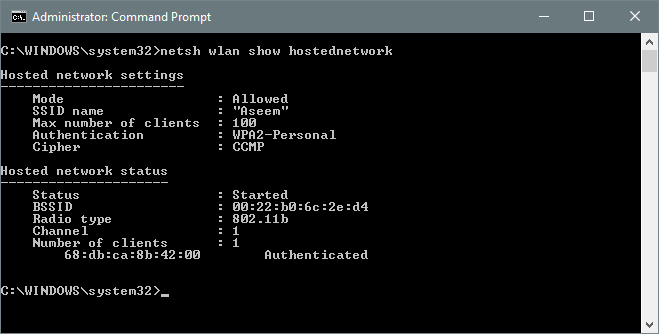
The first thing you want to do is make sure your Wi-Fi network is not connected to any network. Why? We want the Wi-Fi network to use the Internet from the Ethernet port or tethered device, therefore the Wi-Fi network should remain disconnected to start.You can check this by clicking on Start and then typing in ncpa.cpl and pressing Enter. You should see a red X next to the icon.Now we have to open an Administrative Command Prompt window. Click on Start, type in command, and then right-click on the top result and choose Run as Administrator.Next, we have to create our virtual wireless network and start it. To do this, you need to type in the following commands:As you can see, you can choose a SSID for your new network and set the password also. Whatever SSID you set will be the name of the wireless network that shows up on other devices. Once the network has been started, go to Control Panel and open the Network and Sharing Center.You will see the current network you are connected to, which in my case is Ethernet 2. Below that, you should see your new network, which will say No network access and Identifying. If you open ncpa.cpl again or click on Change adapter settings in Network and Sharing Center, you’ll see that Local Area Connection 3 is actually Microsoft Hosted Network Virtual Adapter.Now in order to get the new network to have Internet access, we need to configure the other network connection. In my example, that would be Ethernet 2. Go ahead and click on the blue link for Ethernet 2. You can also go to ncpa.cpl again, right-click on Ethernet 2 and choose Properties.This will bring up the status window for the connection. Now click on the Properties button.Click on the Sharing tab and then check the Allow other network users to connect through this computer’s Internet connection box. Under Home networking connection, you need to select the adapter name for the new virtual wireless network, which is Local Area Connection 3 in my case. If you don’t know the name of the adapter, go to ncpa.cpl and find the one that says Microsoft Hosted Network Virtual Adapter.Now when you go to the Network and Sharing Center, you will see that the new connection also has Internet access.That’s it! Now you should have a functioning wireless network that will allows others to connect and use the Ethernet or tethered connection for Internet access. Go to any of your other devices and look for your new wireless network. Connect using the password you set and you should be good to go.Note that if you want to see how many people are connected to your new wireless network, you have to open a command prompt and type in the following command:Finally, if you are done with sharing your network connection, you can get rid of the virtual wireless network by typing in the following two commands:Make sure you type in both of these commands so that if you ever need to create the virtual wireless network again, you will be able to do so. That’s about it. Hopefully, this article will help you share your Internet connection easily with others. If you run into any issues, feel free to post a comment. Enjoy!

