Like your desktop computer, your Android device also offers the option to capture screenshots. Android has this feature for a really long time and it’s available on most devices based on this operating system.There are actually multiple ways to take screenshots on an Android device. Depending on what device you have and what your preferences are, you can use any of these methods to capture your screens.
Capture a Screenshot on Android Using a Key Combo
One of the convenient ways to capture your current screen on your device is to use a key combination. Almost every Android device that ships has a key shortcut that when pressed, takes a picture of your current screen.This key combination isn’t fixed and it varies by device models. For example, the key combination that works on a OnePlus Android device may not work on a Samsung device even though both run the same operating system.Here’s the list of the keys you need to press to take a screenshot on various Android devices:
Google Pixel: Power + Volume DownSamsung: Power + Volume DownLG: Lock + Volume DownHTC: Power + HomeOnePlus: Power + Volume DownMotorola: Power + Volume DownSony: Power + Volume Down
As you can see, most devices use the Power and Volume Down key combo to capture a screenshot. If you can’t find a combination for your device in the list, use this generic one and it should work in most cases.
Take a Screenshot on Android Using The Power Button
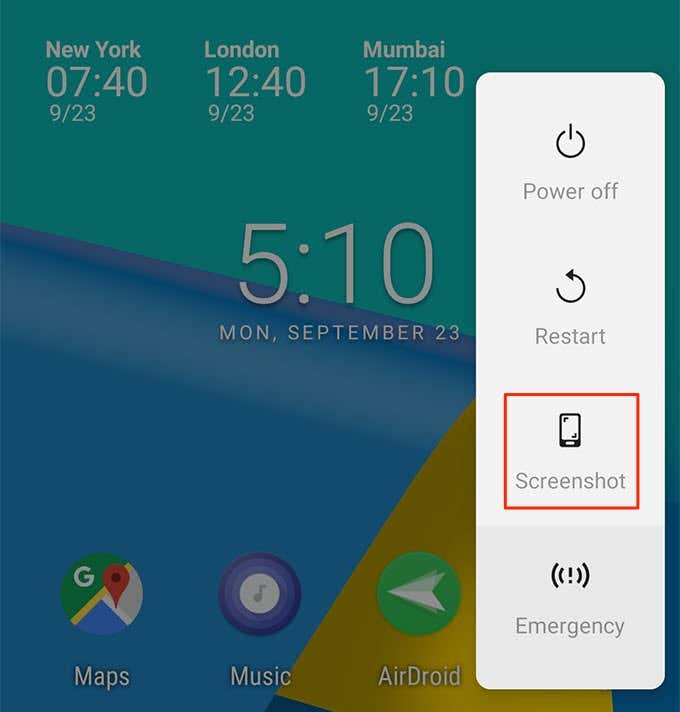
On an Android device, the Power button does more than just turning your device on and off. It helps you lock your device, unlock your device, reboot your device, and even take a screenshot on your device.While most users are aware of the common functions of the Power button, they may not know that the button has the screen capturing option available in it as well. This can be accessed by opening the power menu on your device.This should work on most Android based phones and tablets
Get to the screen where you want to take a screenshot.Press and hold down the Power button on your device.A menu will pop-up on your screen with a few options in it. Tap on the option that says Screenshot to capture a screenshot.
A screenshot of your current Android screen will be captured and saved in the default screenshots folder on your Android device. This screenshot will be without the power menu although you see the menu when the screenshot is being taken.You can then find this screenshot using the file manager or gallery app on your device.
Grab a Screenshot On Your Android Device Wirelessly
If you’re going to transfer your screenshots from your device to your computer after capturing them, you don’t need to go through that hassle as you can take screenshots directly on your computer.There’s a utility that allows you to take screenshots of your Android device on your computer wirelessly. It’s called AirDroid and you’ve likely heard of it if you’re a regular reader of this site (or if you’ve ever wanted to transfer files from Android to Mac or PC).All that this requires is both your devices should be connected to the same WiFi network.
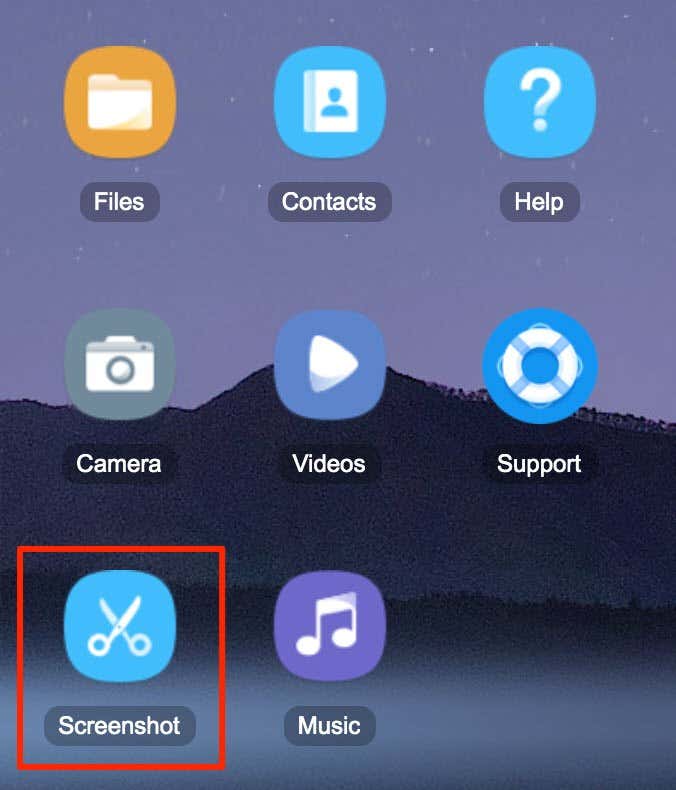
Download, install, and launch the AirDroid app on your Android device.Tap on AirDroid Web and note down the local IP address you see there.Open a new browser tab on your computer and type in the IP address you noted down earlier. Hit Enter and AirDroid will launch on your computer.On the AirDroid’s main interface on your computer, find and click on the option that says Screenshot.
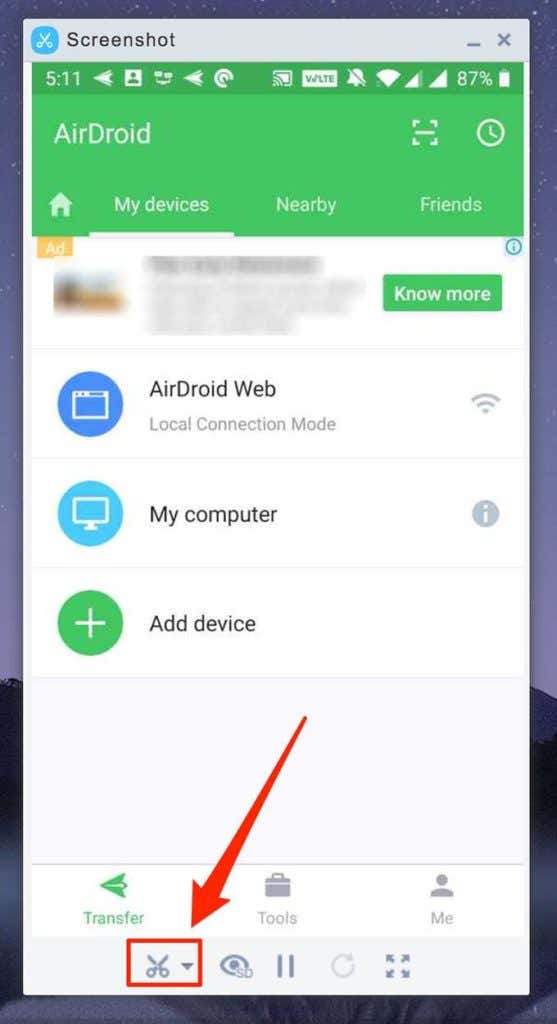
You’ll instantly see your device’s screen being mirrored to your computer. Get to the screen where you want to capture a screenshot on your device and click on the scissor icon on your computer.
A screenshot will be captured and saved on your computer.You can also get AirDroid to save screenshots on your device itself if you’d like by clicking on the down-arrow icon next to the scissor icon. It’ll then let you choose a destination for your screenshot files.
Use Android Debug Bridge To Capture Your Android Screen
ADB has a number of commands to help you execute actions on your Android device from your computer. This utility can be used both with and without cables but getting the wired one set up is pretty easy and only takes half a minute.Once you’ve set the utility up on your computer, all you need to do is issue a command and your Android screenshot will be captured.
Download and extract ADB toolkit on your Windows, Mac, or Linux based computer.Head to Settings > Developer options and enable USB debugging on your device.Connect your device to your computer. Windows users should launch a command prompt window in the ADB folder. Mac users need to launch Terminal and make the ADB folder your current working directory.Run the following command on your computer to take a screenshot.adb shell screencap -p /sdcard/screenshot.png (Windows users)./adb shell screencap -p /sdcard/screenshot.png (Mac users)
Execute the following command to bring the screenshot to your computer.adb pull /sdcard/screenshot.png (Windows users)./adb pull /sdcard/screenshot.png (Mac users)
You’ll find the screenshot image file in the root directory of your ADB folder.If you face any difficulties while capturing the screenshot, make sure you’ve allowed the USB debugging prompt on your Android device. This gives your computer access to your device.


